Virtual machines, or VMs, have been a convenient aspect of cloud computing for quite some time. VMs provide flexibility, scalability, and control of your IT environment. Here is the step-by-step guide for: How to Create Windows 11 VM in Azure, one of the most popular cloud platforms out there.
You can easily set up a Windows 11 VM on Azure platform, thus making it an ideal platform for testing purposes, development or even operations.
Table of Contents
If you have made the plans of setting up a Windows 11 VM on Azure, then consider this step-by-step guide to cover all aspects, starting with picking the right machine configuration to connecting through RDP. Whether you’re new to cloud computing or an experienced professional, this guide will help you navigate the process efficiently.
Before we dive into setting up a Windows 11 virtual machine on Azure, let’s first take a quick look at the Windows 11 versions that Azure supports.
Supported Windows 11 versions on Azure
Windows 11 offers several different versions, each designed for a specific set of use scenarios. Choose the version that works best for you. The following are Windows 11 editions available in Azure:
- Windows 11 Enterprise N, version 21H2
- Windows 11 Enterprise, version 21H2
- Windows 11 Enterprise multi-session, version 21H2
- Windows 11 Enterprise N, version 22H2
- Windows 11 Pro, version 22H2 ZH-CN
- Windows 11 Pro, version 22H2
- Windows 11 Pro N, version 22H2
- Windows 11 Enterprise, version 22H2
- Windows 11 Enterprise multi-session, version 22H2
- Windows 11 Enterprise, version 23H2
- Windows 11 Pro, version 23H2
- Windows 11 Enterprise N, version 23H2
- Windows 11 Pro, version 23H2 ZH-CN
- Windows 11 Enterprise multi-session, version 23H2
- Windows 11 Pro N, version 23H2
Windows 11 versions which are removed by the publisher
- Windows 11 Pro, version 21H2 ZH-CN – was removed by the publisher on Thursday 29 August 2024.
- Windows 11 Pro, version 21H2 – was removed by the publisher on Thursday 29 August 2024.
- Windows 11 Pro N, version 21H2 – was removed by the publisher on Thursday 29 August 2024.
How to Create Windows 11 VM in Azure
To set up or create a Windows 11 virtual machine (VM) on Azure, follow the below steps:
Step 1: Login to Azure Portal
First, log in to your Azure account by visiting the Azure Portal.
I assume you already have an azure account. If not, please read the article how to create a free Microsoft Azure account on the official Azure website, and get free $200 in credits for the first 30 days.
Step 2: Create a New Virtual Machines
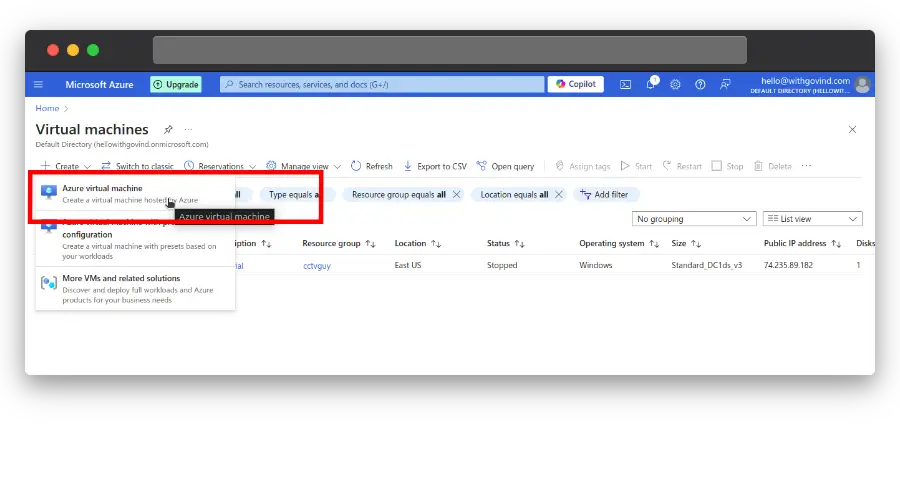
Once you’re logged in, click on the “Virtual Machines”. You can also search using search bar, type “Virtual machine” and select from the drop down.
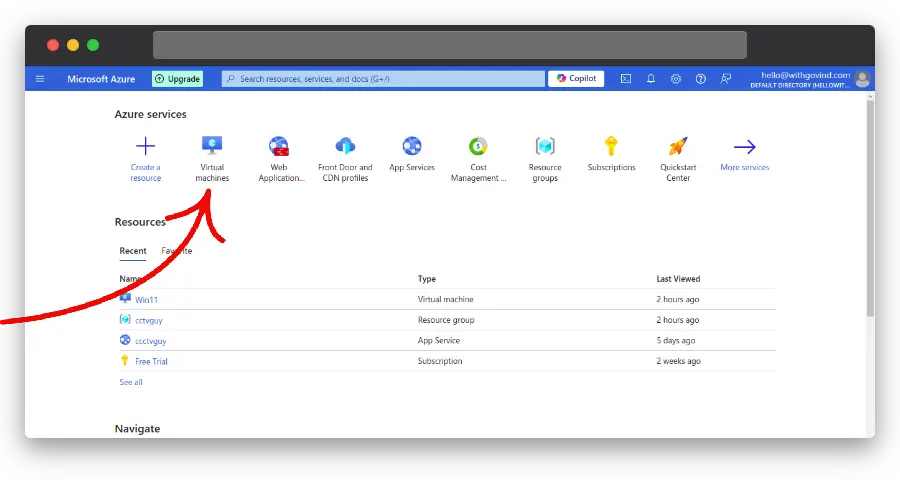
Click on “+ Create” and select Azure virtual machine (as shown in below image)
It will open a new window.
Step 3: Choosing Your Machine’s Configuration
In the basic tab, under Project details, select your Subscriptions and Resource Group. See the screenshot:
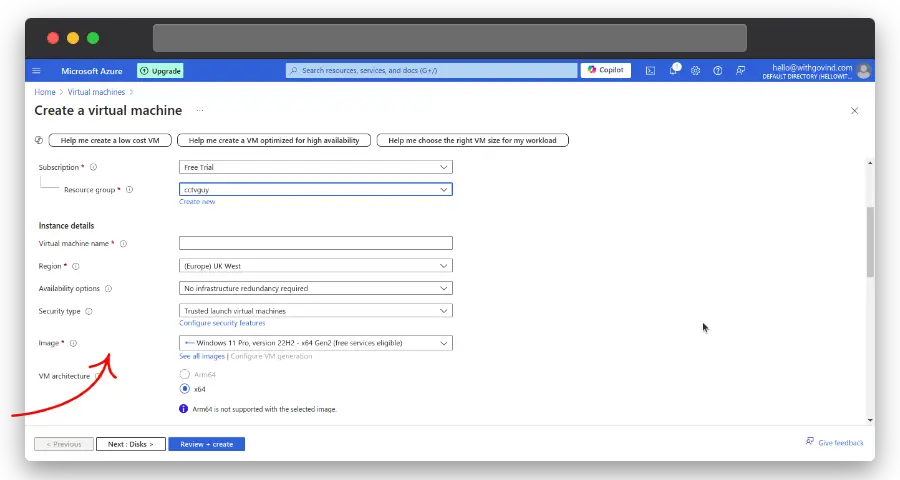
Subscription: Select Your Existing Subscription.
Resource Group: You might create a new one, or select from an existing resource group. Resource groups simply help you organize your Azure resources for ease of management.
Virtual machine name: Under Instance details, you have to provide your Virtual machine name. For example we will call it “Win 11” as we are creating our Windows 11 VM.
Region: Next we have to select the region for our virtual machine. Azure offers the numerous regions around the world. You have to choose the Azure region that’s right fit for you and closest to your customers.The region you select affects latency, performance, and compliance.
For Availability options leave it as default.
Security type: Select Trusted launch virtual machines
Image: Here we will be selecting our operating system’s image. We will use or select Windows 11 Pro, version 22H2 – x64 Gen2 for the operating system.
The operating systems in Azure are constantly updated, and you may select from a range of different editions that will serve you best. Click on “See all images” to explore all the available operating system in Azure Market place.
Note: By default VM Generation will be “Generation 2”, if you want to switch to Generation 1, you can change it by clicking “Configure VM generation” in image selection section.
Size: Here, you will need to select the size for your Windows 11 VM; Azure provides multiple sizes for virtual machine needs for any practical purpose.
General Purpose VM Sizes: Ideal for testing, development, small file shares, and small databases. If you need a Windows 11 VM for basic tasks, this is a great option. (Which we are using in this article – see screenshot below)
Compute-Optimized VM Sizes: Best for applications with high computational needs due to a larger CPU-to-memory ratio.
Memory-Optimized VM Sizes: Designed for memory-intensive applications like databases or big data analysis, offering excellent performance.
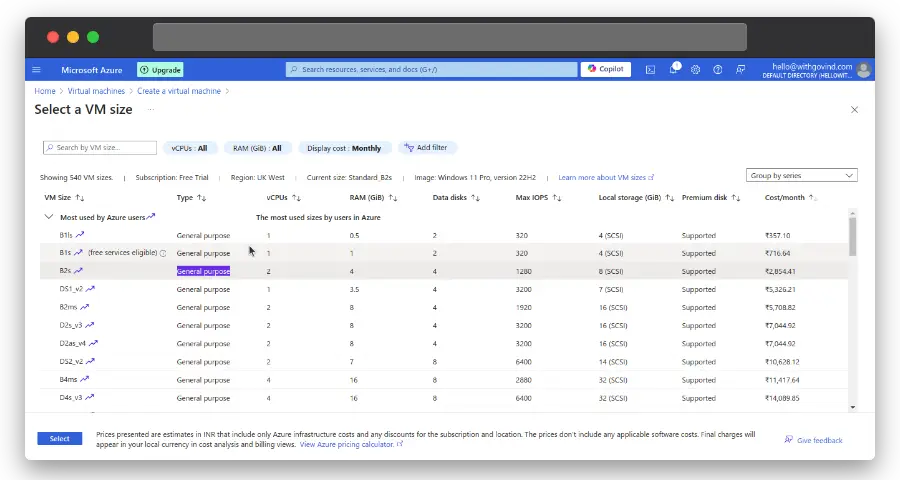
Key Considerations:
- The CPU and memory requirements
- Cost/month
- The performance of the network
- Type of workload – it could be a development, production, or testing environment.
After you make your selection on configuring your virtual machine, the next step is setting up the essential settings.
Step 4: Administrator account Setup
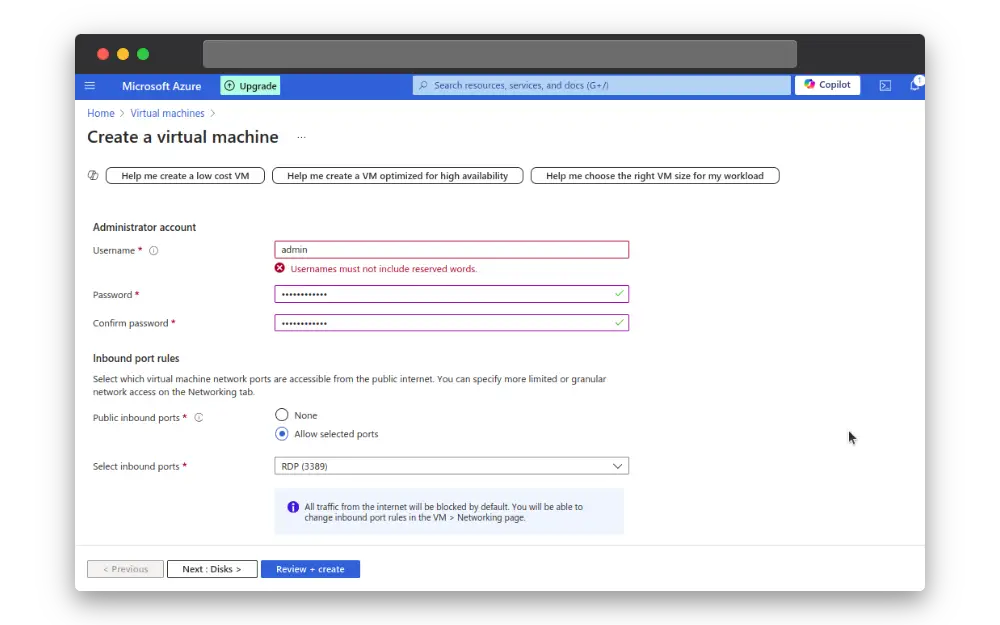
Username: Select a unique and an uncommon username for your Windows 11 VM. you username must not include reserved words such as admin, administrator, user, test, etc.
Password: choose strong login password for your Windows 11 VM
Inbound port rules: You will have to configure inbound rules for network ports which will allow connections to the virtual machine from the public internet. These rules are essential to access the VM.
For this tutorial, I’ll choose the “Allow Selected Ports” option. From there, I’ll specifically select RDP (Remote Desktop Protocol) port 3389 as the inbound port. This will enable me to remotely connect to and control the Windows 11 virtual machine on Azure using RDP.
This setup is useful for testing purposes, allowing you to securely access your VM from anywhere.
Licensing: Since this is going to be your work virtual machine, you need to confirm that you have a valid Windows 11 license that supports the hosting tenancy.
Check the checkbox which says “I confirm I have an eligible Windows 10/11 license with multi-tenant hosting rights”
Optional but Key Considerations:
- OS disk size and OS disk type (choice of storage: Standard/Premium SSD or HDD)
- Network interface – virtual network, subnet and Azure load balancer
- Management (Enable auto-shutdown, Backup etc.)
You can change or select these above consideration later once your VM is created.
Then click on Review + Create to begin the process of creating your Windows 11 VM on Azure cloud.
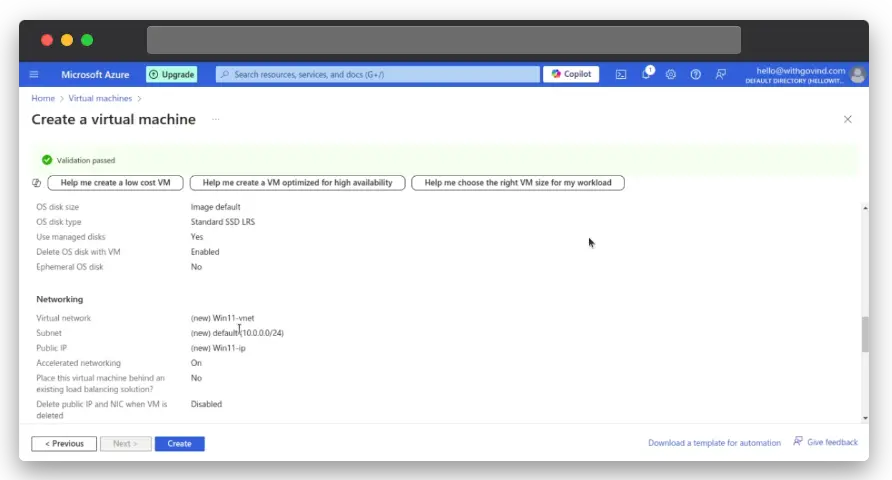
Once you will see a green Validation Passed message, click on “Create” button on bottom to create Windows 11 virtual machine.
The next window will show you that deployment is in progress. This process will take sometime, so please wait for few minutes and do not click anywhere.
Once the VM deployment is complete you will see the similar below screen. From here you can download and save your deployment details.
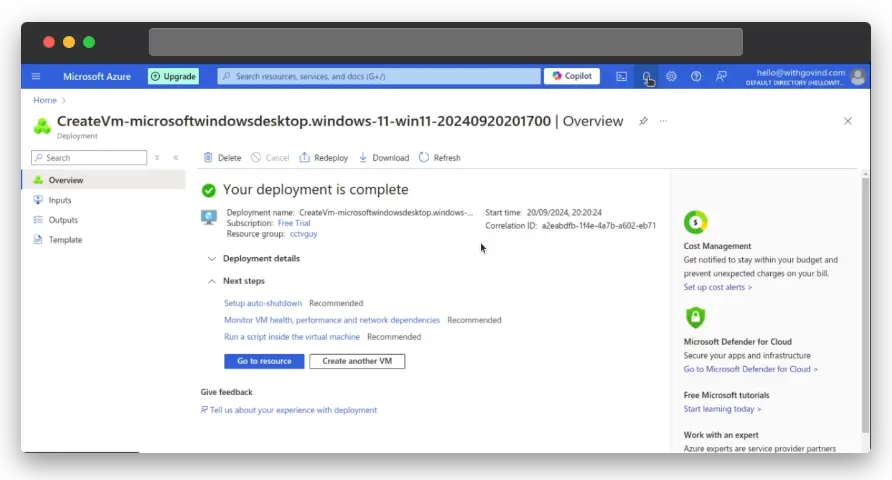
Pro Tip: Setup or Enable auto-shutdown for your Virtual Machine when it’s not in use. This will help you save on Azure credits by avoiding unnecessary charges.
Now click on Go to resources to see the status and other details of your Win 11 VM.
Access Virtual Machine using RDP
Once you have created your Windows 11 VM, you will want to connect to it. The standard way of connecting to your Windows 11 VM in Azure is through the Remote Desktop Protocol (RDP).
Note: RDP port 3389 is open to the internet, but this should only be done for testing purposes. In a production environment, it’s not safe to use RDP over a public IP. I personally do not use RDP over public IP. Instead, it’s better to connect through a VPN or a private connection for security.
How to Connect Windows 11 VM via RDP
Start in the Azure portal and select your VM from the list of resources.
Then click Connect underneath the “Overview” tab.
Here, you will choose the connection method as RDP.
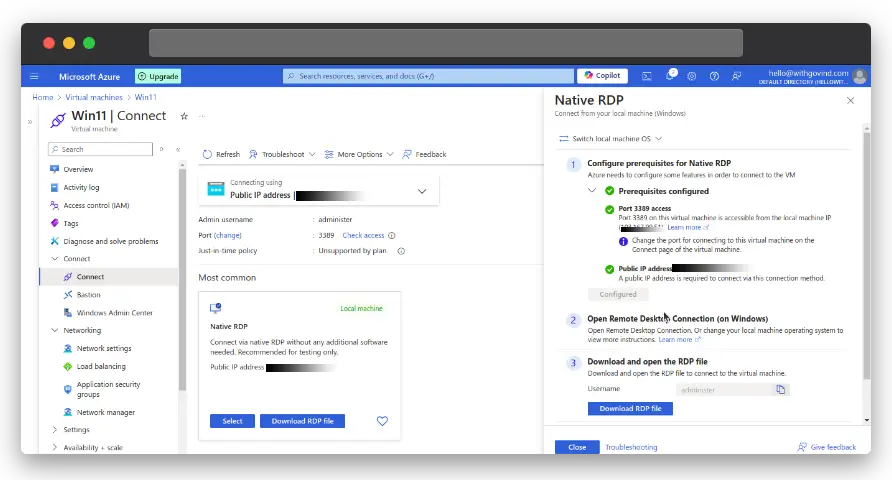
Download the RDP file from Azure, or type in the public IP address of the VM into your remote desktop client.
Enter the username and password that you chose during the setup for the VM (Step 4).
Security Tip:
Set up your Network Security Group (NSG) to restrict access to your Windows 11 VM over RDP to trusted IPs only. This will minimize the chance of having unwanted RDP connection to your VM.
Conclusion
In this guide, we’ve covered everything you need to know to Create a Windows 11 VM in Azure — from selecting the appropriate machine configuration to setting up the right pricing plan and connecting via RDP. Whether you’re a developer, a tester, or an IT professional, creating a Windows 11 VM on Azure gives you a scalable, flexible environment for your tasks.
Congratulations, you have made it to the end of setting up your Windows 11 VM! Got any cool tips and tricks about optimizing virtual machine performance? Or perhaps setup-specific advice? Let’s hear from you. Share them in the comments!

