Google Chrome is one of the most popular web browsers, known for its security, and wide range of features. If you’re using Ubuntu, a popular Linux distribution, you might want to install Chrome for a better browsing experience. In this guide firstly we will walk you through the steps to install Chrome in Ubuntu and then show you how you can update and uninstall chrome safely.
Table of Contents
Install Chrome in Ubuntu 24.04 LTS
We will be installing Google chrome using two methods which are GUI and Terminal.
Method 1: Install Google Chrome Using GUI
Learn how to install Google Chrome on Ubuntu using the graphical user interface (GUI), perfect for users who prefer a more visual. Follow the below step-by-step approach.
Step 1: Open Firefox or any other web browser you use.
Step 2: Search for Google Chrome on Firefox or click on the below link
https://www.google.com/chrome/

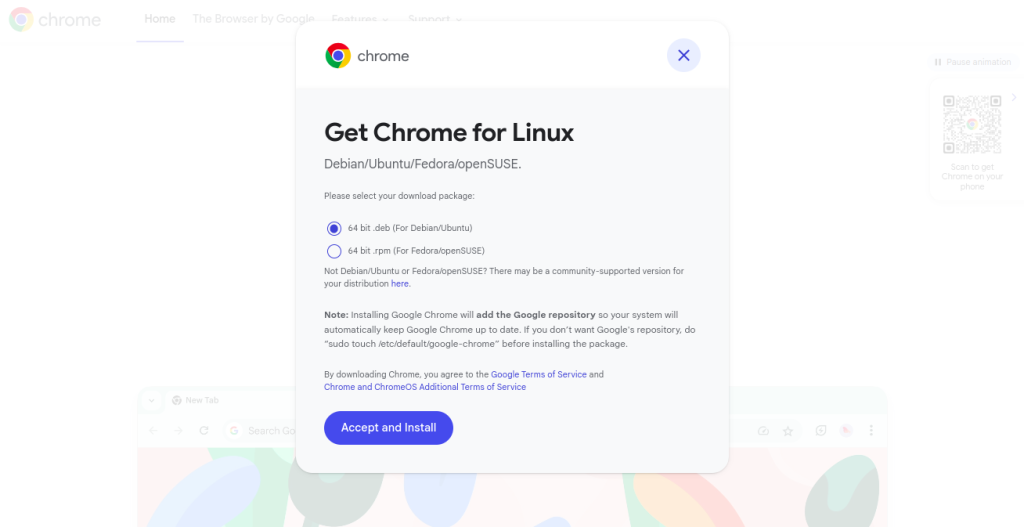
Step 3: Select the first option 64-bit.deb (for Debian/Ubuntu).
Step 4: Choose Accept and Install.
The Chrome setup file should be downloading now. Please wait for the download to complete.
Step 6: Go to downloads and right click on setup file “google-chrome-stable_current_amd64.deb” and select open with “Software Install”
See the screenshot:
Step 7: Click on Install button to install the chrome. That’s it.
A stable Google chrome version is successfully installed on your Ubuntu Linux machine.
Method 2: Install Google Chrome Using Terminal
If you want to install Google Chrome Browser in Ubuntu via terminal then you can follow the below steps:
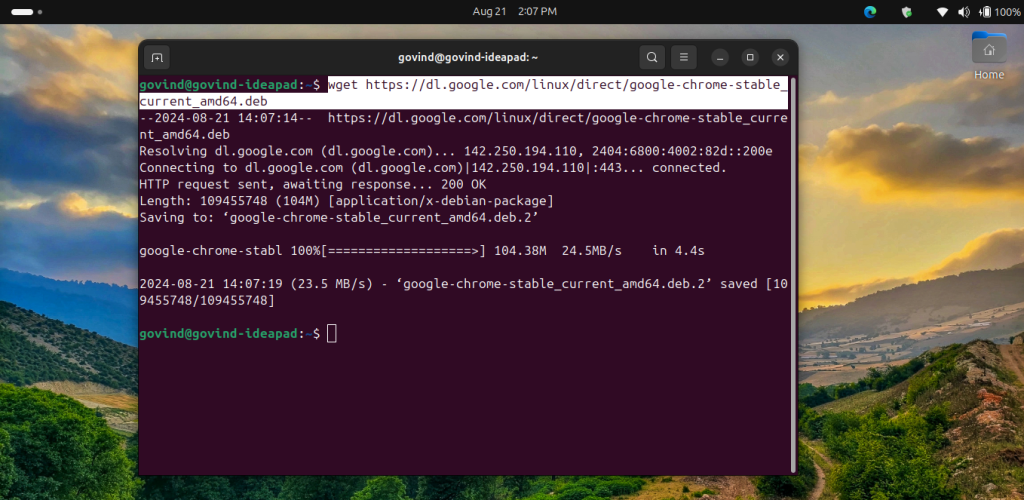
Step 1: Open Terminal ( CTRL + ALT + T ) and type the following command to download the Google Chrome .deb package.
wget https://dl.google.com/linux/direct/google-chrome-stable_current_amd64.deb
Step 2: Execute the following command to Install the package using dpkg:
sudo dpkg -i google-chrome-stable_current_amd64.debNote: You will be required to use an administrator password to execute these commands. Type your admin password and press Enter (↵) to proceed.

Step 3: Fix any dependency issues (if necessary):
sudo apt-get install -fThis command installs any missing dependencies that might have been reported during the installation.
Congratulations! You’ve successfully installed Chrome on Ubuntu using the terminal, and you’re now ready to enjoy a faster, more secure browsing experience.
Watch Full Installation Video
How to update Chrome in Ubuntu?
1. Using the Terminal
Google Chrome is typically updated along with the rest of your system packages using the apt package manager. Here’s how you can do it:
Open Terminal ( CTRL + ALT + T ) and type the following command to update the package list:
sudo apt updateNote: You will be required to use an administrator password to execute these commands. Type your admin password and press Enter (↵) to proceed.
Execute the following command to upgrade Google Chrome:
sudo apt --only-upgrade install google-chrome-stableAlternatively, Upgrade all packages, including Google Chrome:
sudo apt upgradeIt should be asking for your permission “Do you want to continue? [Y/n]”
Type “y” and press ↵ enter to proceed
This will update Google Chrome along with all other installed packages.
2. Using the Graphical Interface
- Open “Software Updater”:
Search for “Software Updater” in your applications menu and open it. - Check for updates:
The Software Updater will check for available updates, including Google Chrome. - Install updates:
If Google Chrome updates are available, they will be listed. You can then proceed to install them by following the on-screen instructions.

3. Automatic Updates
Google Chrome usually installs updates automatically in the background, so you might not need to do anything manually. However, checking manually as described above ensures you’re always running the latest version.
How to Uninstall Chrome from Ubuntu?
Method 1: Uninstall Chrome Using GUI
Step 1: Open the Ubuntu Software or Software Centre in the Ubuntu system and go to installed apps.
Step 2: Go to Installed section, find Google Chrome and click on the uninstall/Trash button and confirm uninstall
Method 2: Uninstall Chrome Using Terminal
To uninstall Google Chrome from your Ubuntu system using the terminal, follow these steps:
Step 1: Press CTRL + ALT + T to open Terminal in Ubuntu.
Step 2: Copy and paste the following command to remove Google Chrome:
sudo apt remove google-chrome-stableStep 3: Remove Configuration Files (Optional)
If you want to remove Chrome’s configuration files, which include user settings and cached data, you can use the purge option:
sudo apt --purge remove google-chrome-stableStep 4: Remove Google Chrome’s Repository (Optional)
If you added Google’s repository to your sources list manually when installing Chrome, you can remove it by editing the sources list:
sudo nano /etc/apt/sources.list.d/google-chrome.listDelete the line that refers to Google’s repository, then save and close the file.
Step 5: Finally, update your package list to reflect the changes:
sudo apt updateThis will completely uninstall Google Chrome and remove any traces of it from your system.
Conclusion
Managing Google Chrome on Ubuntu is a straightforward process that can be efficiently handled through the GUI and terminal. Whether you’re installing, updating, or uninstalling Chrome, the commands provided make it easy to maintain this essential browser on your system. By following the steps outlined in this guide, you can ensure that you always have the latest version of Chrome running smoothly or remove it entirely when necessary. Keeping your software up-to-date is crucial for security and performance, and with these simple commands, you can manage Chrome effortlessly on your Ubuntu machine.
Need assistance? We’re here to help – contact us


