In this article, we will go through the steps by step to install WordPress on Azure and the key benefits of using Azure app services for your WordPress site. Whether you’re a beginner or a seasoned developer, this guide will help you with the WordPress installation on Azure process.
Before diving into the installation process of WordPress on Azure let’s understand the benefits of using WordPress on Microsoft Azure App Services
Topics we covered in this article:
Benefits of Using WordPress on Azure
1. Scalability
WordPress on Azure allows you to scale your website easily as your traffic grows. Azure offers flexible scaling options to accommodate varying levels of user activity without affecting performance.
2. Secure Hosting
Azure provides a secure hosting environment for your WordPress site, ensuring data protection and compliance with industry standards. With Azure’s robust security features, you can have peace of mind knowing your website is safe from potential threats.
3. Global Reach
By hosting your WordPress on Azure, you can leverage Microsoft’s global network of data centers to reach audiences around the world. This ensures faster loading times and a reliable user experience regardless of location.
4.High Availability and Uptime
Azure ensures high availability and uptime through its 99.9% SLA (Service Level Agreement). Microsoft Azure cloud service also use Load Balancers and Traffic Managers, to ensures your website or web app stays up and running, even during high-traffic periods or server failures.
5. Backup and Recovery Solutions
Azure provides automated backups and recovery options, ensuring that your all website data is safe. In case of any data loss or corruption, you can easily restore your site to a previous state.
Step-by-Step Process to Install WordPress on Azure
By following the below installation steps and taking advantage of the benefits of hosting WordPress on Azure, you can create a powerful and efficient website that is optimized for success.
Before getting started, you’ll have to create a free Microsoft Azure account on the official Azure website, which offers $200 in credits for the first 30 days.
Step 1: Login to Azure Portal
First, log in to your Azure account by visiting the Azure Portal. If you don’t have an account, sign up for a free trial.
Step 2: Create a New Resource
Once you’re logged in, click on the “Create a resource” button in the upper-left corner of the dashboard. In the search bar, type “WordPress” and hit enter. You will see a list of WordPress offerings in the Azure marketplace. Select WordPress On App Service from the list.
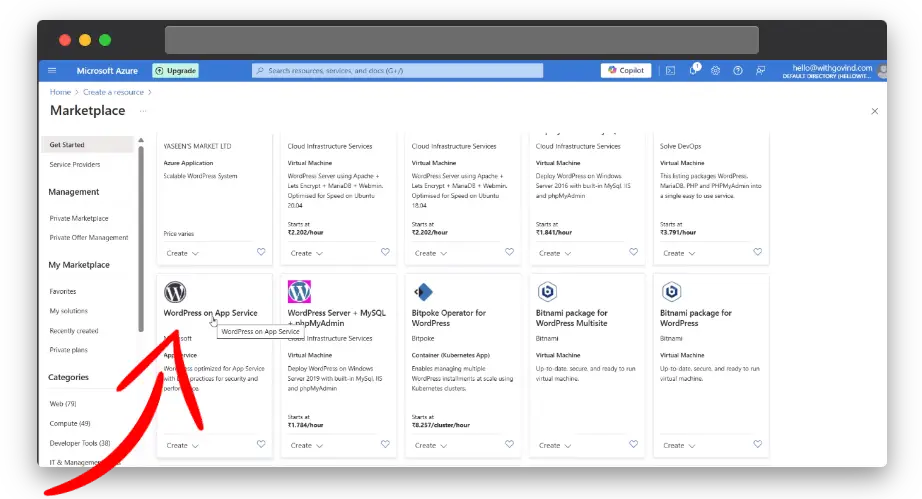
This pre-built template from Microsoft bundles your WordPress site with an App Services Web App and Azure MySQL database instances for a seamless, integrated setup. So you do not have to worry about creating these resources manually or separately.
Step 3: Configure Basic Settings
In the next screen, you’ll need to fill in some basic settings:
- Subscription: Choose your Azure subscription plan.
- Resource Group: Create a new resource group or select an existing one. So you can organize your resources easily.
- App Name: Choose a unique name for your WordPress site.
- Region: Select a region for your host that is geographically close to your target audience to ensure faster load times.
Step 4: Select and Configure the Hosting Plan:
This is one of the important step for your WordPress on Azure. This is where you select the hosting plan and server configuration for your WordPress site. Depending on your budget, expected website traffic, you can choose any suitable pricing tiers:
- Free (F1): Trial plan. Suitable for basic testing only not for production site.
- Basic (B1): Suitable for small websites with limited traffic.
- Standard (S1): Suitable for medium-traffic websites.
- Premium (P1): Suitable for high-traffic or resource-intensive websites.
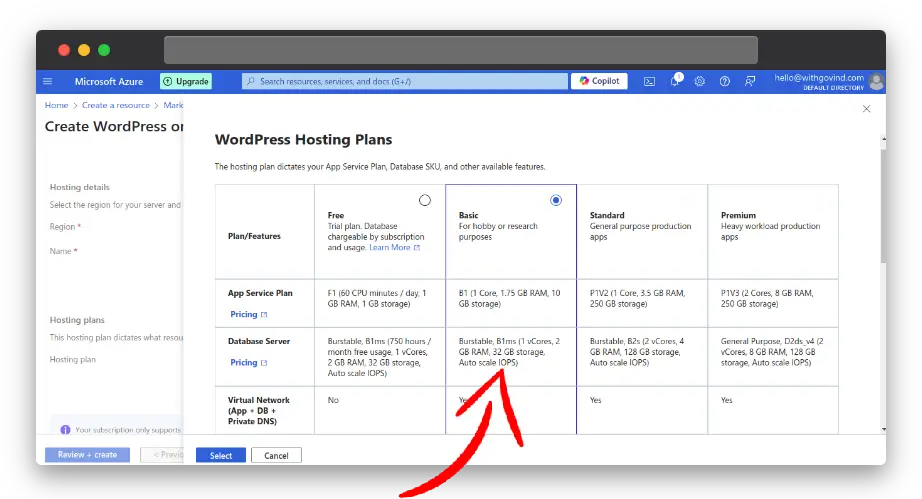
For beginners and micro businesses, the Basic plan is a good to start with, and you can scale up later if your website traffic increases.
Step 5: WordPress setup
This is also an important step in setting up your WordPress site. Here, you’ll create your admin login details (wp-admin credentials), which you’ll need later to sign in to your WordPress dashboard and make updates or add new content to your website.
- Site Language: Select the language for your site.
- Admin Email: Enter your email for admin notifications.
- Admin Username: Create a username to log in as the site admin.
- Admin Password: Set a secure password for your admin account.
Step 6: Selecting Add-ins And Staging Environment (Optional)
- Add-ins: By default, recommended add-ins are already selected for you. You can simply review by clicking on Next – Add-in button and select as per your need. If you’d like to include additional add-ins, such as Email with Azure Communication Services or Azure CDN, you can add those here for extra functionality.
- Deployment Staging Environment: Here, you can set up a staging environment and enable continuous deployment. Staging Environment site lets you test changes before making them live, helping to avoid any issues on your live main site.
Note: Staging site creation is not available for all subscriptions or hosting plans, so choose the right one for your needs.
Step 7: Review and Create
Review all the settings you’ve configured and click Create. This will start deploying your WordPress on Azure, which may take a few minutes. Once the deployment is complete, you will receive a notification.
Step 8: Access Your WordPress Site
Once your WordPress installation is deployed, go to the Resource Group you created and find the App Service of your site.
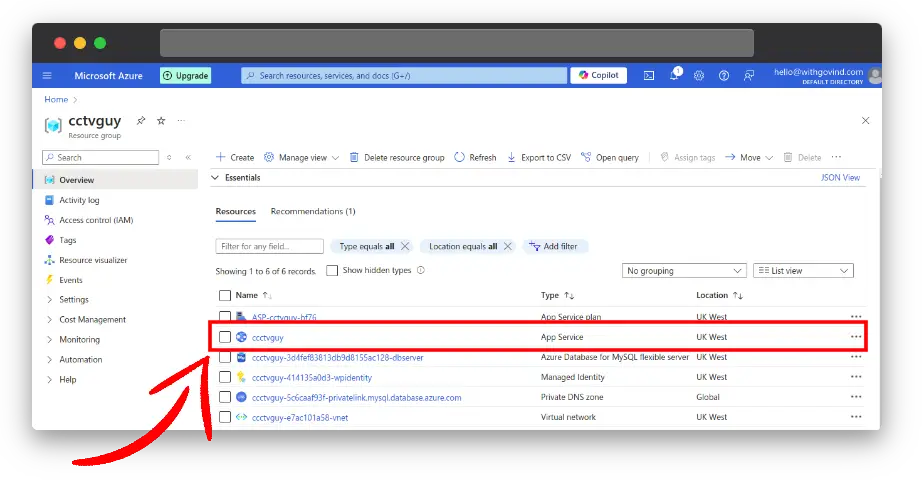
Click on the Default domain URL link (as shown in screenshot), and it will open a new tab with newly installed WordPress site with default WordPress theme.
Initially (only first time) you may see a message on screen Please wait… WordPress is Installing. Check back soon.
This WordPress installation may take up-to 5-6 minutes
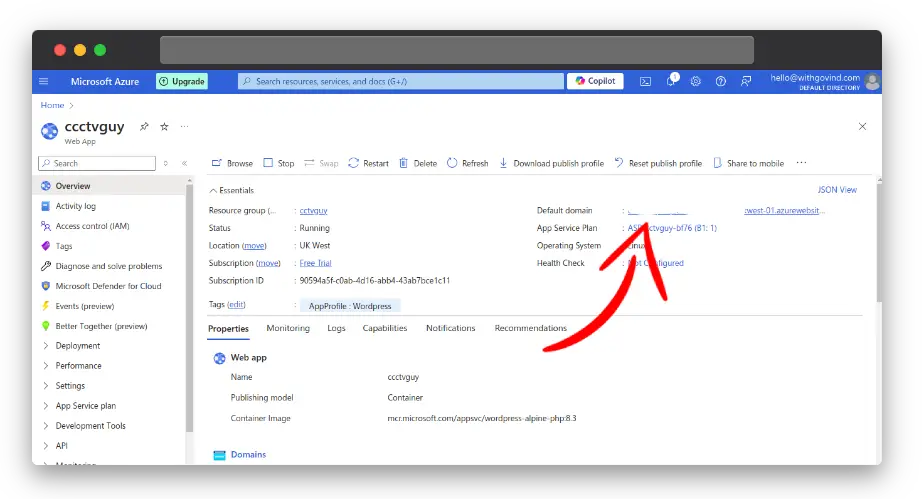
If you can access your WordPress site using the Default Domain URL with the default WordPress theme installed, Congratulations! You have successfully installed WordPress on Azure.
Watch Video Tutorial on YouTube
Watch the video version of this tutorial on YouTube for an easy-to-follow guide.
Conclusion
Hosting WordPress on Azure combines the best features of both platforms. Microsoft’s trusted cloud services and WordPress’s easy-to-use website CMS.
Whether you’re creating a personal blog, an online store, or a business website, Azure offers a solution that can help you grow, keep your site safe, and deliver great performance.
By following the step-by-step guide outlined above, you can quickly and easily install WordPress on Azure. The added benefits of global reach, robust security, and high performance make Azure an excellent choice for hosting your WordPress site on cloud.
Final Note: If you’re seeking a WordPress hosting solution that fits your business website and delivers excellent performance, WordPress on Azure is a great option to consider.

